Moving Externally Orchestrated Prefect Pipelines to Prefect Cloud
One of the things that makes Prefect such a great data pipeline framework (in my opinion) is the ability to write a pipeline as a standalone piece of code, and execute it independently of any built in scheduler or larger framework.
This is great for two reasons:
- Local testing becomes immensely easier.
- Integration with existing systems becomes possible without having to interface with some Prefect scheudler.
For those who might come from the Luigi world, these might seem obvious, but since many folks these days jumped right into Airflow, I find the second point above is not always appreciated as much as it might be.
A nice part of building pipelines in Luigi was that we were always able to separate our internal task dependency logic (i.e inside the pipeline) from our pipeline scheduling or execution logic. This has the added benefit of making the transition from some other pipeline framework more painless, since we can first rewrite our pipeline as Luigi (or Prefect) pipeline (or Flow), and swap it in using the existing scheduler. Once we’ve sufficiently moved our pipeline code to the new framework, we can handle swapping out the orchestration (if we so desire.)
Similar to Luigi, Prefect allows one to handle these two aspects – intra-flow task dependencies and flow orchestration – totally separately at the framework level. Even better than Luigi though, Prefect fills in the gaps that many of these other frameworks lack.
While this is a subtle point to some, I hope other engineers that have had to perform large scale framework transitions of sprawling data estates appreciate the power that this kind of decoupling brings.
Prefect Cloud
In our last posts, we built a pipeline using Prefect that simulated an ELT process for Bridge & Tunnel Traffic Data. Conveniently, we didn’t need to spend any time thinking about how we would orchestrate the execution of our pipeline while building it, and that’s a good thing.
With our pipeline built and tested, it’s now an appropriate question to ask how it is we plan to schedule and orchestate this pipeline, and others like it. For this, we have essentially two options:
Essentially, these are the same, however Prefect Server is the open source scheduling server, and Prefect Cloud is the managed offering by PrefectHQ. While I would normally suggest starting first with the open source offering and then upgrading to the managed service if/when needed, Prefect Cloud’s free tier is actually pretty fully featured. For any enterprise, you’ll certainly need to upgrade to a paid option if you choose not to self-host the Prefect Server, but for a data engineer validating the framework or building a POC, Prefect Cloud can save a lot of time during the early stages of onboarding.
Having created our free Prefect Cloud instance, we’ll want to create a new
workspace (we can call this mtademo), grab an API key, and log in from our
development machine with
venv/bin/prefect cloud login
From here, we can run our existing pipeline exactly as before
venv/bin/python pipeline.py \
    --storage-account <your-storage-account> \
    --container mta-demo \
    --access-key <your-access-key> \
    --databricks-address <your-databricks-address> \
    --databricks-token <your-databricks-token> \
    --databricks-cluster-id <your-cluster-id> \
    --start-date 2019-01-01 \
    --stop-date 2023-01-01
which should execute exactly as previously, however now the run should be viewable on the UI (under ‘Flow Runs’).
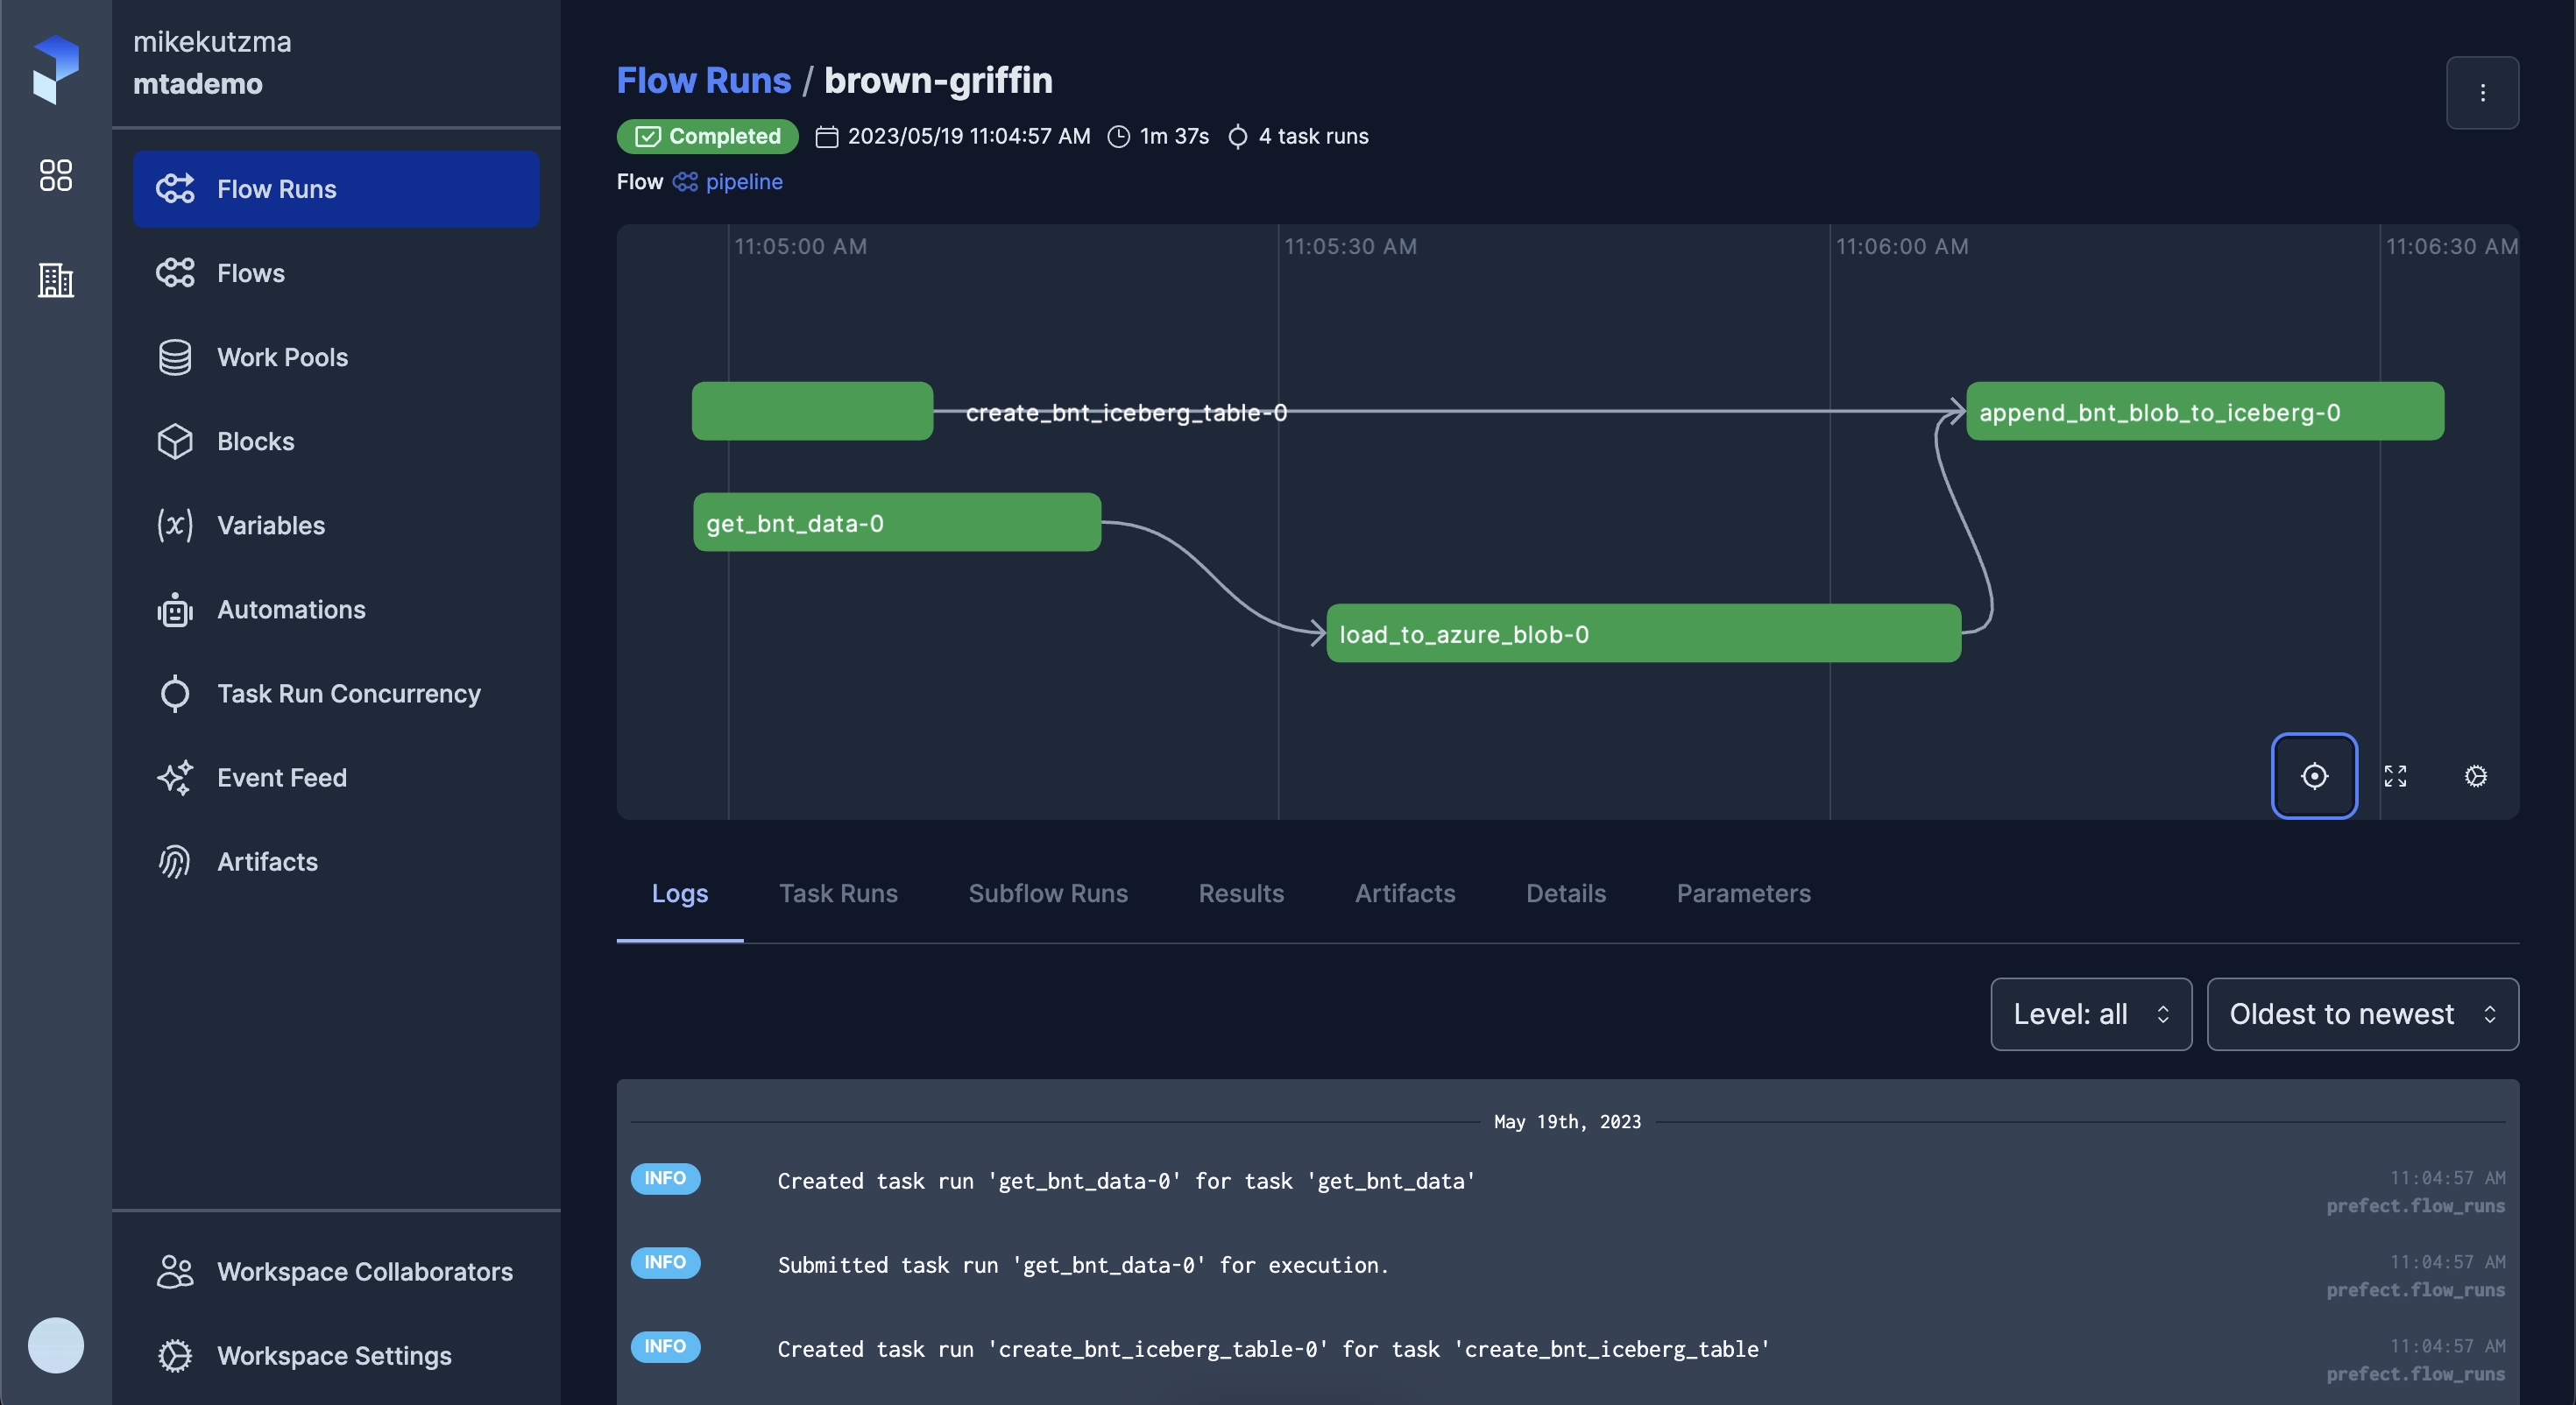
While the prefect server didn’t have any control over the run, you can think of this as the server simply “knowing about” the run. Because of this, from the UI you won’t have any control over executing the run again or scheduling it for a future run.
In order to hand over the orchestration of the pipeline to the server, we’ll need to ‘deploy’ the flow. First though, we’ll take a small detour to set up some Blocks, or stored configs, that will simplify our execution.
Moving configs to Blocks
Blocks are simply structured configs, stored in the Prefect Server database, that are available to flows at runtime.
We’ll use a number of predefined Blocks (mostly to store base level credentials that might be used in multiple other blocks), and compose these with some custom Blocks.
We’ll create a new file in our module mtademo/blocks.py, and add the
following Block defintions
"""
Custom Blocks
"""
from typing import Optional
from azure.storage.blob import BlobClient
from prefect.blocks.core import Block
from prefect.filesystems import Azure
from prefect_databricks import DatabricksCredentials
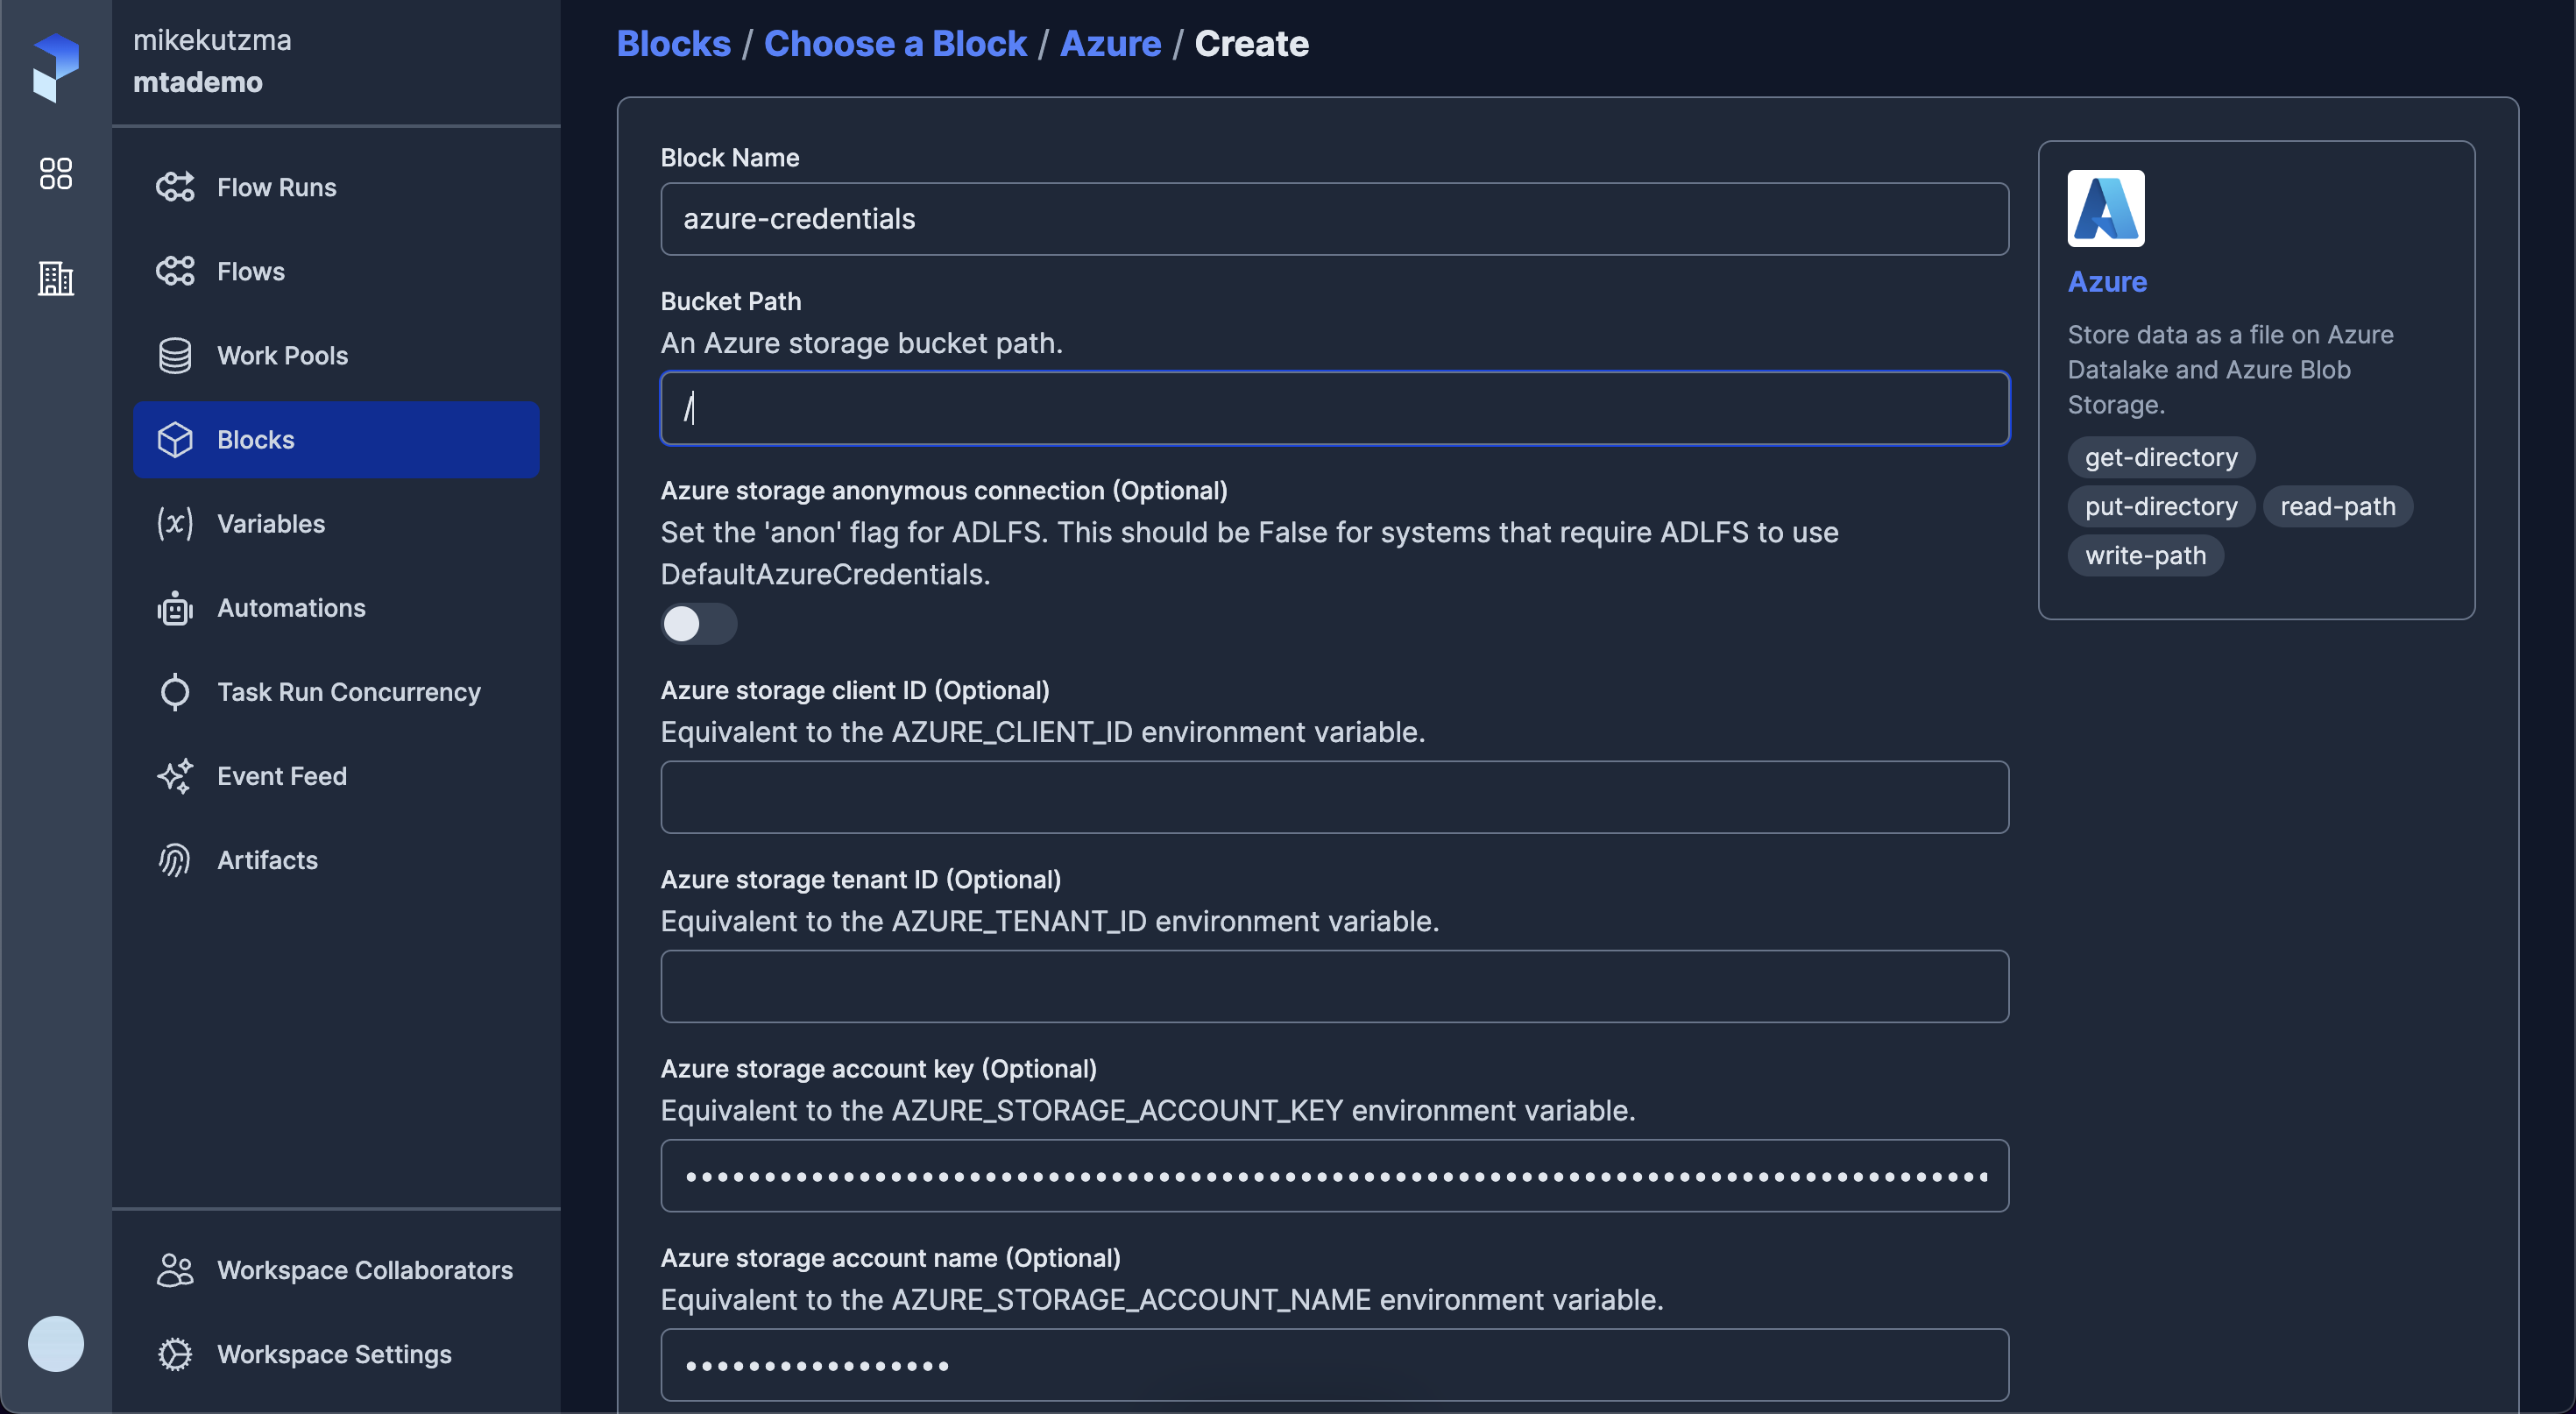
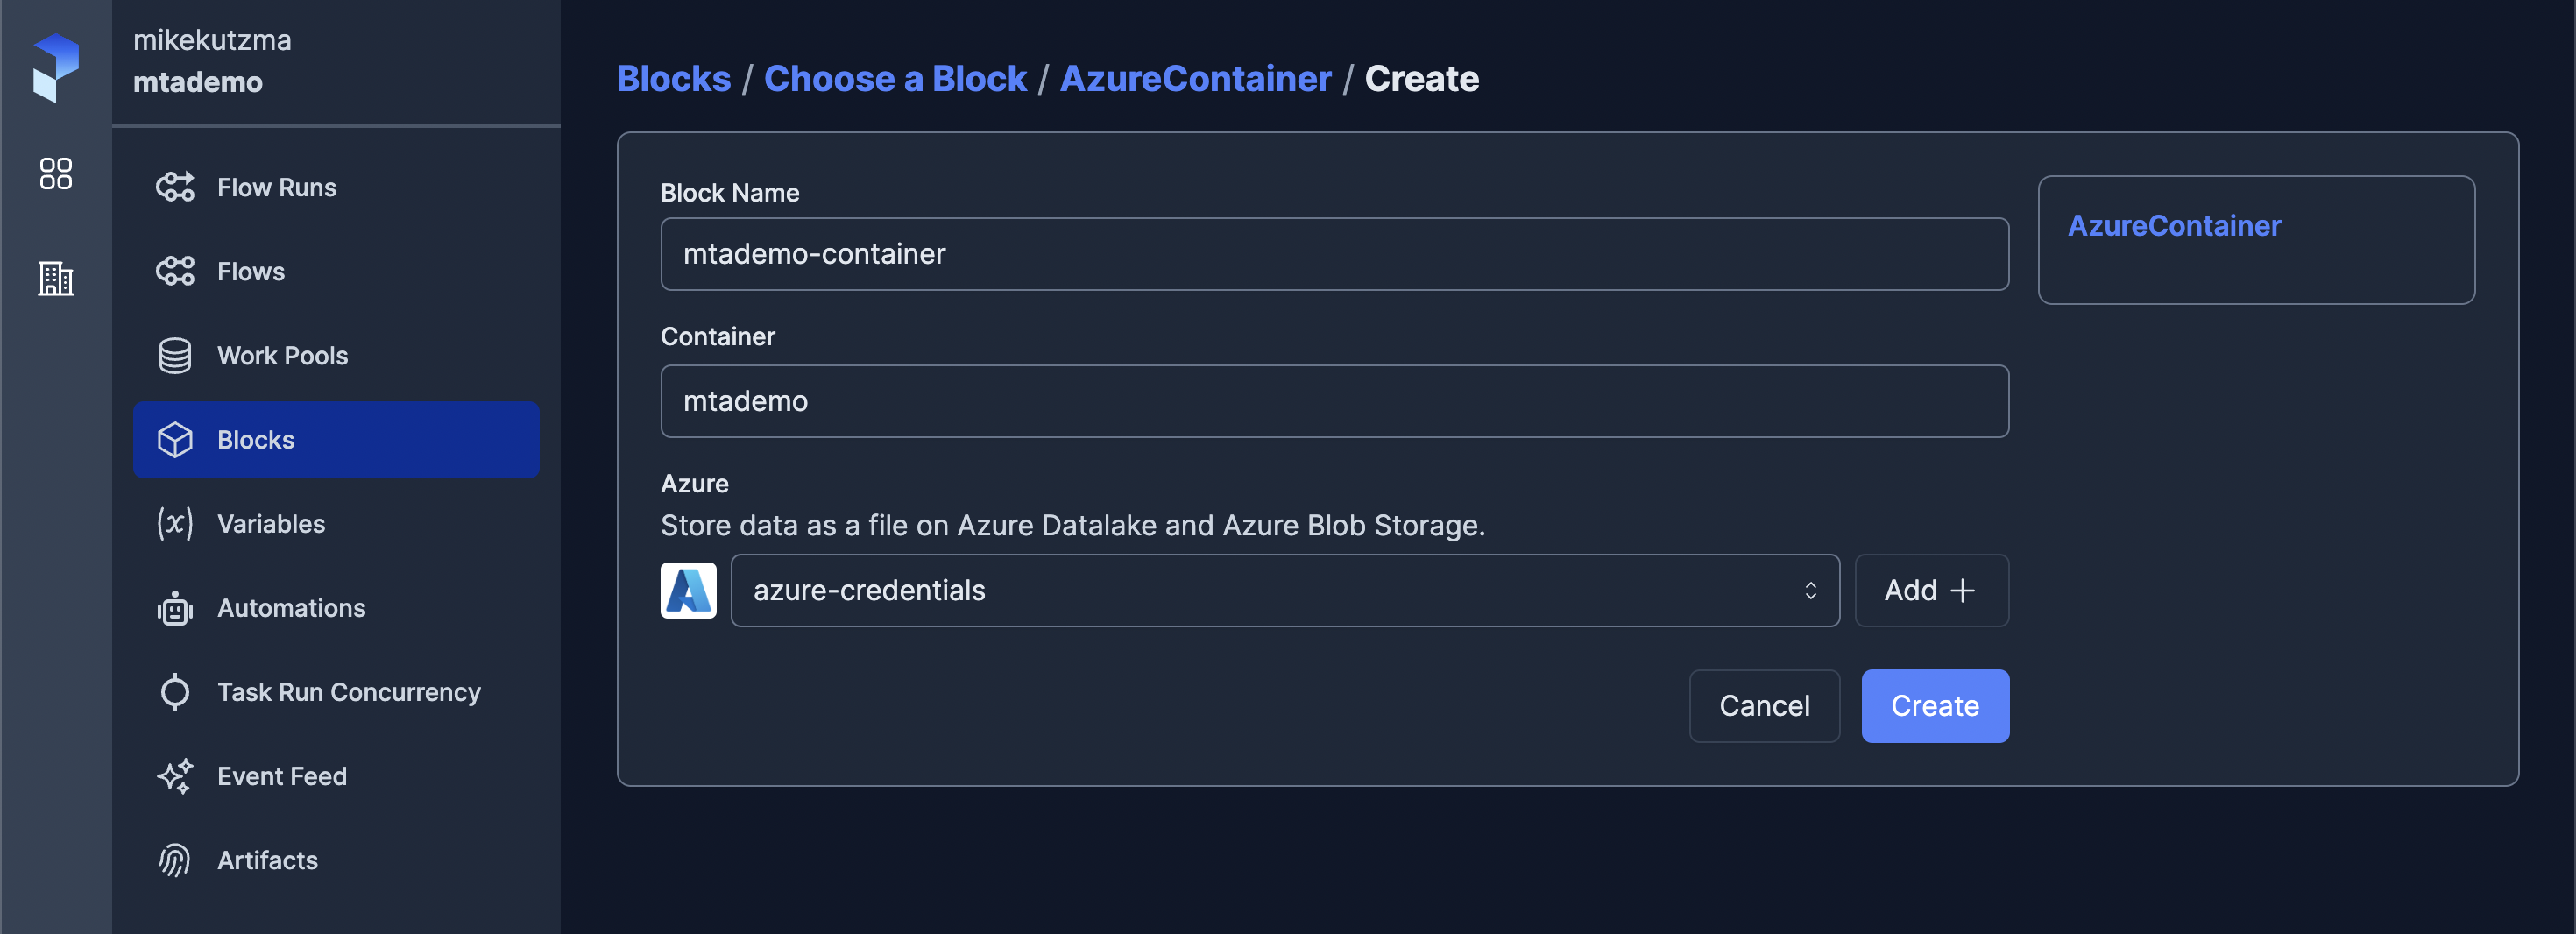
class AzureContainer(Block):
container: str
credentials: Azure
def url(self, path: Optional[str] = None, protocol: Optional[str] = None) -> str:
if protocol in (None, "abfss"):
url = f"abfss://{self.container}@{self.credentials.azure_storage_account_name.get_secret_value()}.dfs.core.windows.net"
elif protocol in ("https", "http"):
url = f"{protocol}://{self.credentials.azure_storage_account_name.get_secret_value()}.blob.core.windows.net"
if path is not None:
url = "/".join([url, path])
return url
def get_blob_client(self, blob_name):
blob = BlobClient(
account_url=self.url(protocol="https"),
container_name=self.container,
blob_name=blob_name,
credential=self.credentials.azure_storage_account_key.get_secret_value(),
)
return blob
class IcebergAzureHadoop(Block):
catalog_name: str
warehouse_location: str
container: AzureContainer
def spark_configs(self):
return {
f"fs.azure.account.key.{self.container.credentials.azure_storage_account_name.get_secret_value()}.dfs.core.windows.net": self.container.credentials.azure_storage_account_key.get_secret_value(),
f"spark.sql.catalog.{self.catalog_name}": "org.apache.iceberg.spark.SparkCatalog",
f"spark.sql.catalog.{self.catalog_name}.type": "hadoop",
f"spark.sql.catalog.{self.catalog_name}.warehouse": self.container.url(
self.warehouse_location
),
}
def get_table_name(self, table: str, zone: Optional[str] = None) -> str:
fqn = self.catalog_name
if zone is not None:
fqn = f"{fqn}.{zone}"
return f"{fqn}.{table}"
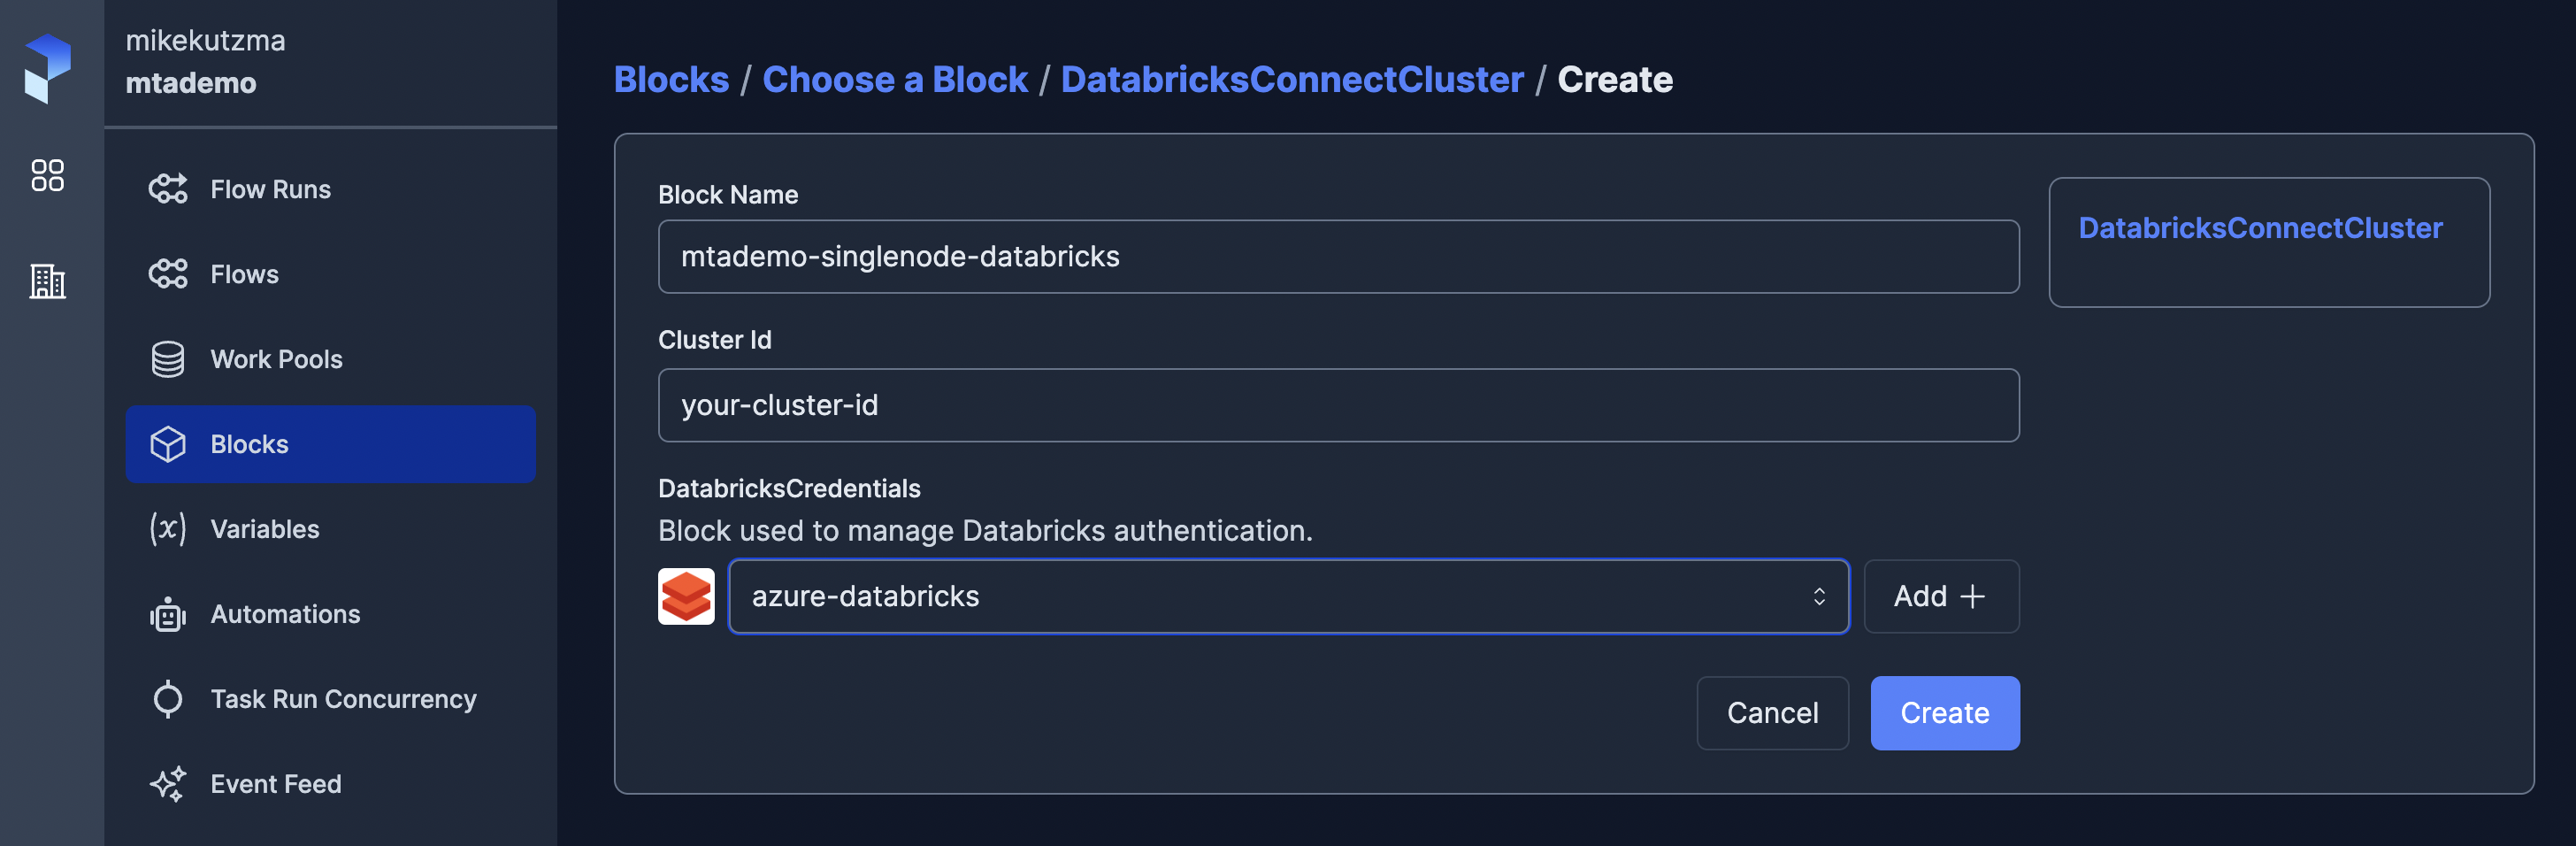
class DatabricksConnectCluster(Block):
cluster_id: str
credentials: DatabricksCredentials
def spark_configs(self):
return {
"spark.databricks.service.address": f"https://{self.credentials.databricks_instance}",
"spark.databricks.service.token": self.credentials.token.get_secret_value(),
"spark.databricks.service.clusterId": self.cluster_id,
}We can then register these blocks with the UI with the command
venv/bin/prefect block register --file mtaprefect/blocks.py
With these registered, we should now see them on the API, and we can begin configuring the Blocks.


With the blocks available on the server, we can now update our pipeline to use them, first importing the blocks form our module
from mtaprefect.blocks import (
    AzureContainer,
    DatabricksConnectCluster,
    IcebergAzureHadoop,
)
And then updating our flow method (Adding some flow parameters as well such as flow name)
@flow(
    name="bnt-hourly-traffic",
    description="Pulls data from Bridge & Tunnel Hourly Traffic dataset and appends to iceberg table in Azure using spark on Databricks",
)
def pipeline(
    start_date: Optional[datetime.date] = None,
    stop_date: Optional[datetime.date] = None,
):
    mtademo_bucket = AzureContainer.load("mtademo-container")
    iceberg = IcebergAzureHadoop.load("mtademo-iceberg")
    databricks_cluster = DatabricksConnectCluster.load("mtademo-singlenode-databricks")

    blob_name = "stage/bnt_traffic_hourly.json"
    table_name = iceberg.get_table_name(zone="bronze", table="bnt_traffic_hourly")

    spark_configs = {**iceberg.spark_configs(), **databricks_cluster.spark_configs()}

    start_date, stop_date = get_bnt_date_params(start_date, stop_date)
    data = get_bnt_data.submit(
        start_date,
        stop_date,
    )

    table_created = create_bnt_iceberg_table.submit(
        spark_configs,
        table_name,
    )

    blob_loaded = load_to_azure_blob.submit(
        data,
        mtademo_bucket,
        blob_name,
        wait_for=[data],
    )

    append_bnt_blob_to_iceberg.submit(
        spark_configs,
        table_name,
        mtademo_bucket.url(blob_name),
        wait_for=[table_created, blob_loaded],
    )
You’ll notice that we’ve also updated our date parameters to be optional, and used another task to get default start and stop dates. We define this task as such
@task
def get_bnt_date_params(
    start_date: Optional[datetime.date],
    stop_date: Optional[datetime.date],
):
    if start_date is None or stop_date is None:
        base_date = prefect.runtime.flow_run.scheduled_start_time
        stop_date = base_date - datetime.timedelta(days=1)
        start_date = base_date - datetime.timedelta(days=8)
    return start_date, stop_date
Here we make use of the scheduled start time to determine the days to run for. Our default will be a week of dates, ending the day before the run date (T-1). However giving these as params allows for running the flow for arbitrary dates if needed for a backfill or some such.
In order to keep things tidy, and allow from growing our project over time,
we’ll alow move our pipeline code under the mtaprefect/flows module. This
module should now look like this
mike@kosh:~/prefect-azure-demo$ tree mtaprefect/
mtaprefect/
├── __init__.py
├── blocks.py
└── flows
    ├── __init__.py
    └── bnt_hourly_traffic.py
Deployment
We’ll use a project-style
deployment. First, we’ll
create our prefect.yaml file
name: prefect-azure-demo
prefect-version: 2.10.9

pull:
- prefect.projects.steps.git_clone_project:
    repository: git@github.com:mikekutzma/prefect-azure-demo.git
    branch: master
    access_token: null
This will allow our worker processes to pull the most up-to-date version on our flows from github.
Next, we’ll define our deployments in the deployment.yaml file.
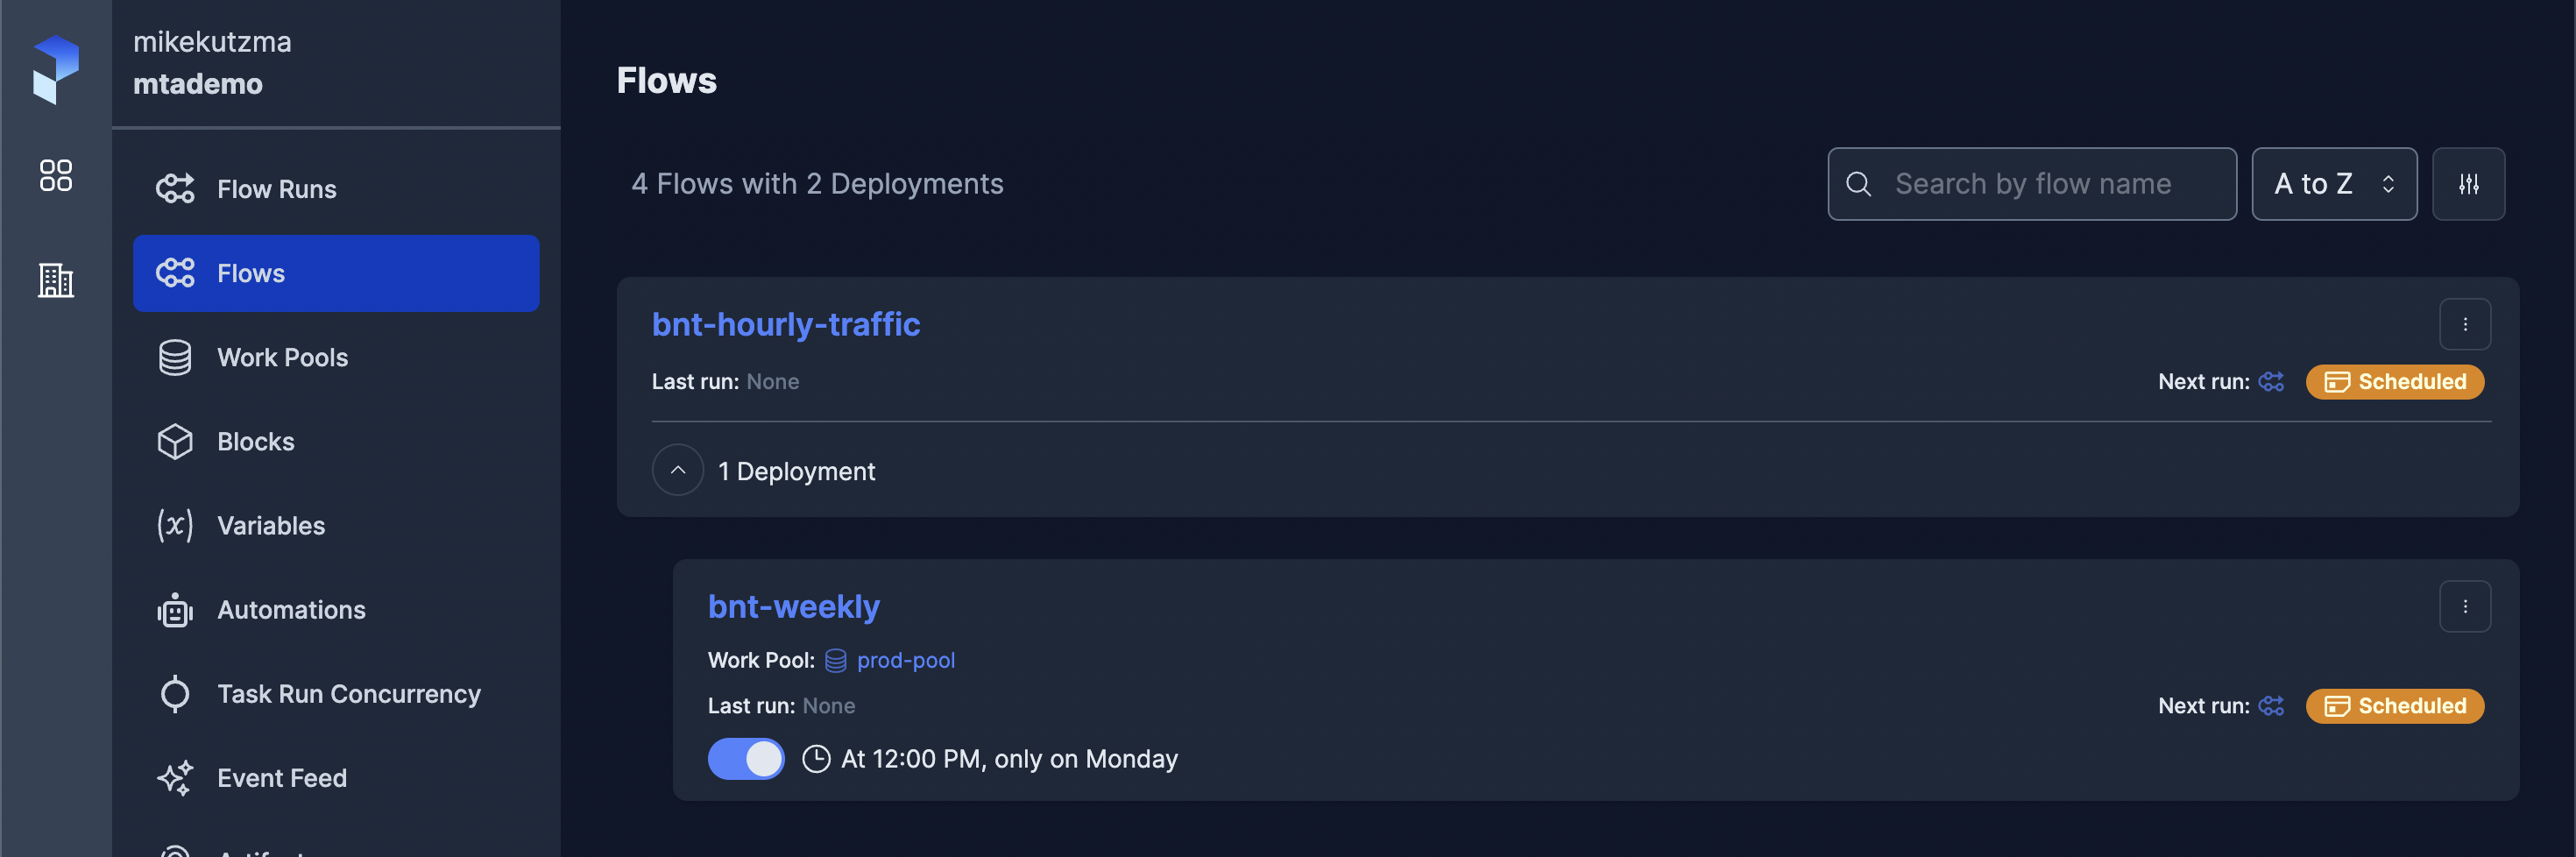
deployments:
  - name: bnt-weekly
    description: BNT Hourly data pulled weekly
    schedule:
      # Every Monday at noon
      cron: "0 12 * * 1"
    entrypoint: mtaprefect/flows/bnt_hourly_traffic.py:pipeline
    work_pool:
      name: prod-pool
This sets our flow to run every monday at noon. This is based on the fact that the dataset is updated every Sunday, so this schedule should allow us not to miss any data.
Finally, with our definitions in place we can deploy our flows with
venv/bin/prefect deploy --all
Having done so, we can now check the UI and see our deployment
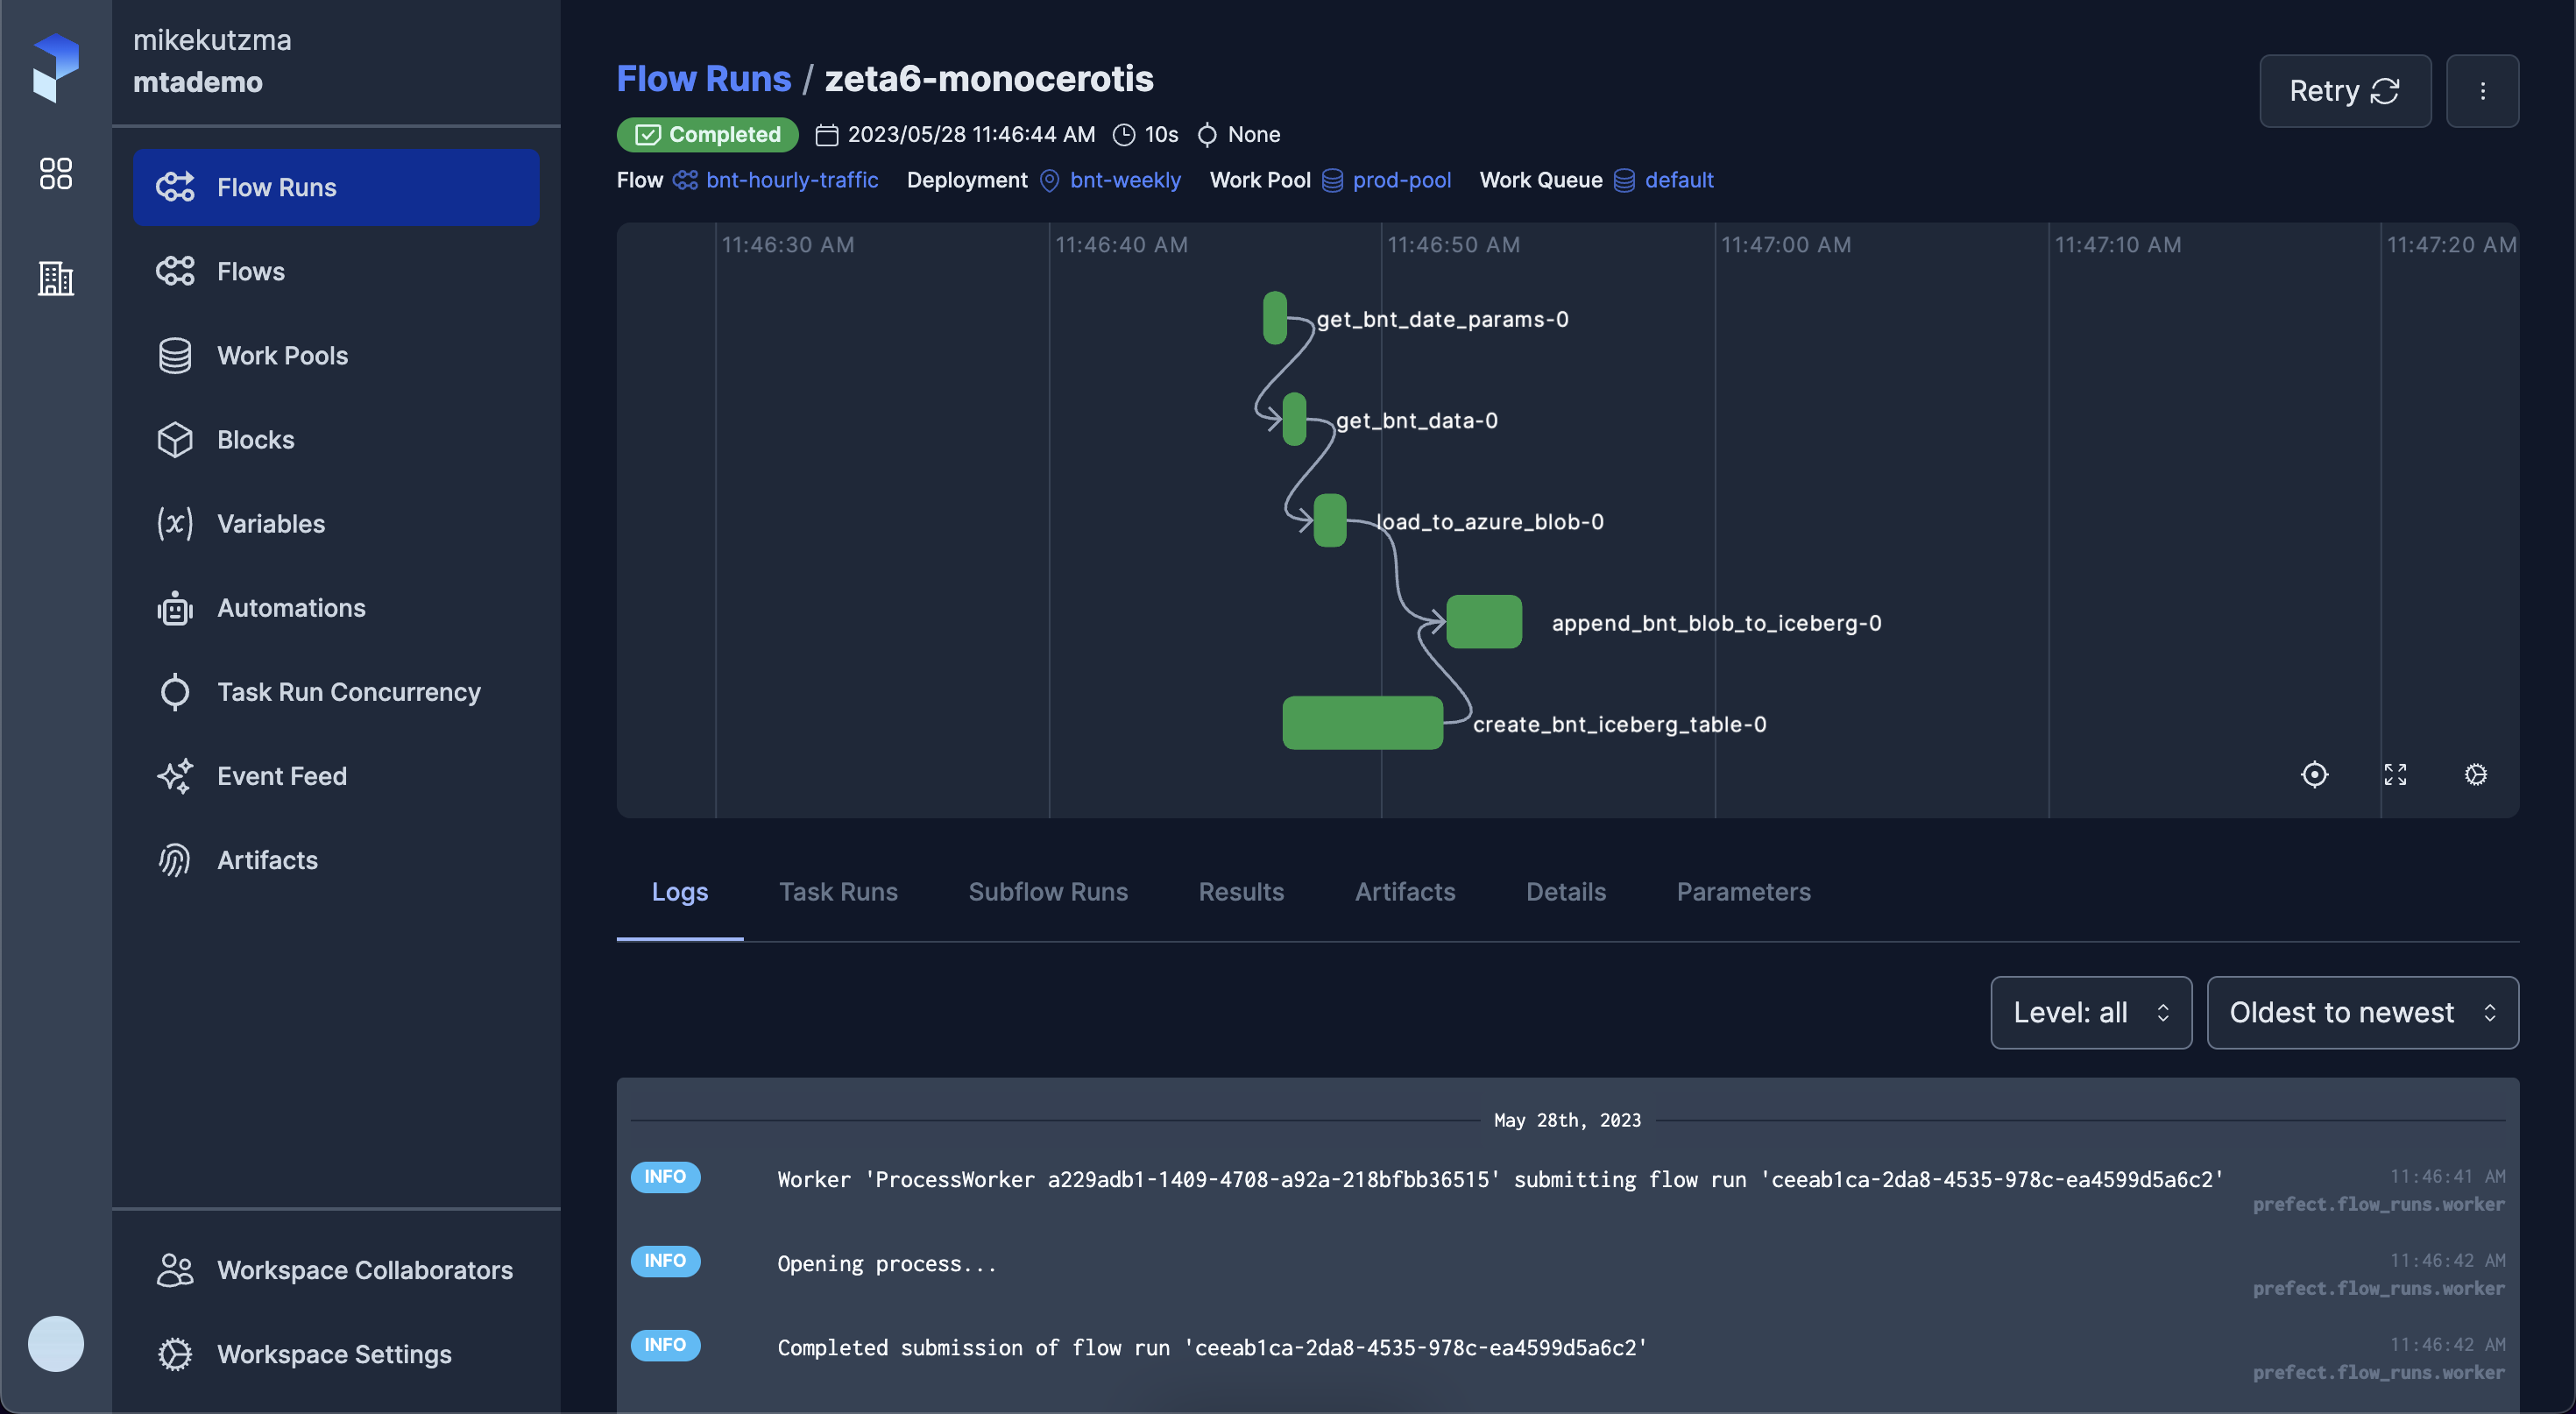
 Finally, provided we have a worker running either locally or in our production
infrastructure, we can execute our flow from the UI or watch for it to run on
schedule.
Finally, provided we have a worker running either locally or in our production
infrastructure, we can execute our flow from the UI or watch for it to run on
schedule.
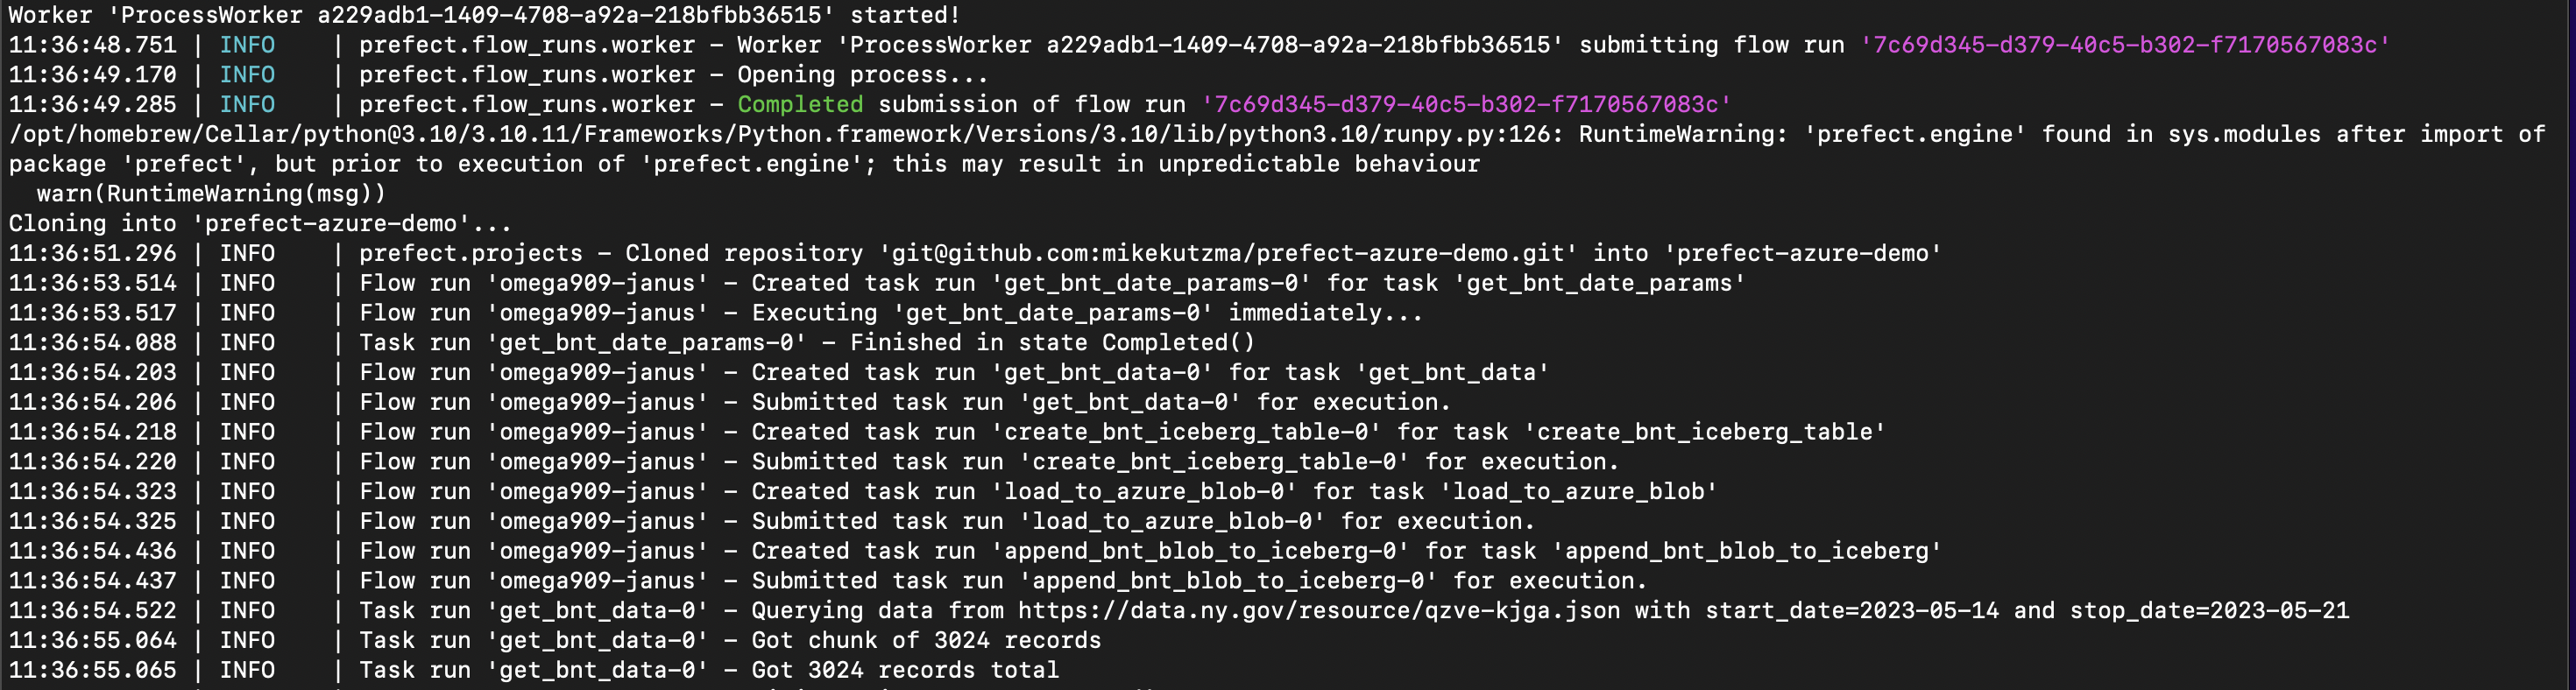
We can see in our worker logs that first thing that happened when it picked up this run was to clone our project from github, and begin execution as usual. We can here start to see how this works well with a productionalized SDLC, where we can manage releases through CI/CD
Accompanying code for this post can be found on github.